Who is this Bee or Dee

A crafting blog for the two of us

Tuesday 31 July 2012

Tuesday Tutorial on SSS

Handbag Card/ Box
I cannot claim this handbag idea as mine have seen it on several blogs/web pages etc but don't know who had the original idea..  Interestingly a friend a teacher who trained with me in the 70's used this idea for teaching a maths project many years ago.
This is the completed project,  I have not done a step by step this time as it is an easy project and fairly self explanatory.  I used stampin up papers and  rubber stamp, but you could use digital papers and stamps.
                                           Back of the box
                                                  Side view
As you can see there is no cutting on the 12 by 12 sheet of card.
Step one- score the card into 9 equal squares .
Step two- in the four corner panels score from the edge to middle square you can see this on the picture below.
Step three- in the two middle edge panels marked the mid point and then score from this point to both the middle panel joining edges, you can see that in the picture.
Step four- fold all the score line and using a scoring  tool re-enforce well.
Step five-The panels are all cut in the same way slightly smaller and adhere to the base card.
Step six -Cut a further piece of matching card 4 by 6 inches and turn the 12 by 12 over to plain side and adhere the card to the middle outside panel, to create a flap.  Cover this flap with a matching paper rectangle, skip the middle panel and then adhere a paper square to the outside middle panel.
Step seven - use a Velcro dot as the closure
Step eight- if you want a ribbon handle punch a hole at each end of the flap and thread through the holes and tie a bow.
As you can see in the picture the card folds up into the correct shape fairly easily.  I do hope these instructions are clear leave a message on my blog here  if you want any help to complete the project.  Do give it a go, once you have made one you will see how easy it is.


Recipe
One 12 by 12 piece of card
Piece of 4 by 6  matching card
Two sheets of matching papers or 1 and half sheets of double sided paper
24 inches of matching ribbon
Velcro dot
Glue of choice
Embellishments to match
Usual tools
Have a good week. Hugs Bee

This is my project for the TIOT challenge Anything Goes

This blog post will be picture heavy but a little word light, as i have quite a few projects to complete.  This is a sewing smash book I made for Debbie.
This is the cover of the box, I used papermania  papers and coloured some of the images.
                                                                   I inked all the edges
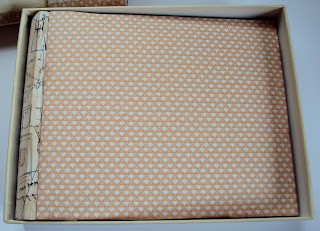
                                                                          This the book
                                               

                                           Inside the book
Thanks for looking Hugs Bee

Monday 30 July 2012

My card for the day on Scrapbook stamp Society

This is my card for today, I am using a  Digi Stamp  called My Little Cook By Sherri Baldy  found here  
 It is a standard 5 by 5 card using Craft work card's  paper and basic pink card
 I coloured the image with pro markers using satin and putty on the clothes with dusky pink accent.  The skin is vanilla with saffron highlights and blush for the cheeks.  The hair is sandstone and tan.
 The sentiment is a free download coloured with the pink, it was cut out with the cameo.
Thanks for looking.
Hugs Bee

Wednesday 25 July 2012

Project for Latinas in America Blog Challenge

This is a box we made at craft group, I really enjoyed making it, thanks for the great inspiration and getting the boxes.
 It was originally a Christmas gift for someone but when I added the quote, I knew it was going to stay with me.
 The papers used are Stampin up, I love this paper pack and have tried to stretch it as far as I can but the sheets are going down.
 The flowers are rolled roses, I made, and the frame is Tim Holtz with one of his tickets put in.
The quote is from Hamlet, and the image is two digital ones merged and reduced in size and coloured with pro markers.

I have entered this project for challenge at latinasenamerica.blogspot.co.uk/ project using lace.

Thanks for looking
Hugs Bee

My card for today for Scrapbook Stamp Society and still a prize to give away


This is a standard card, it a 5 by 5 inches in size, I used a -greyscale  Digi Doodle Download tamp  from

Mitzi Sato-Wiuff


I  asked on my previous post of a card coloured for you to guess how I coloured it in, and  leave an answer/comment on my blog post  and a comment on this post and if I get 20 plus  guesses/comments on my blog post here, ( I only got five comments so I am going to carry it onto this post, if you comment last time and comment this time, you will have two entries).  I will give away a digital image of your choice from the shop, everyone will go in the draw.  The prize is to celebrate Bradley Wiggins success in winning the Tour.


 The paper used is craft house and basic brown card, the image is printed craft card from stampin up


I again decorated the inside of the card with a smaller image.
Have a great week look forward to hearing from you.
Hugs Bee
Saturday 21 July 2012

My card for today for Scrapbook Stamp Society and a prize


This is a tent card, it a 5 by 5 inches in size, I used Viridisincendia -greyscale  Digi Doodle Download Stamp 

Mitzi Sato-Wiuff

 Can you guess how I coloured it in, leave an answer/comment on my blog post  and a comment on this post and if I get 20 plus  guesses/comments on my blog post here, I will give away a digital image of your choice from the shop, everyone will go in the draw.  The prize is to celebrate Bradley Wiggins success.
 The paper used is paper mania and basic black card, the image is printed craft card from stampin up
 I even decorated the inside of the card with a smaller image.
Have a great week-end look forward to hearing from you.
Hugs Bee

Friday 20 July 2012

THE WONDER OF WINTER BLOG HOP ON ADDICTED-TO-STAMPS


Hi You should have arrived here from the lovely Gill  


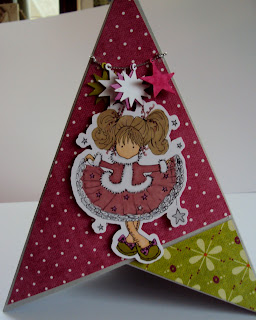
This is my offering for the hop I have used the   Lil Sweetie Winter Star Digi Doodle by Sherri Baldy  digital image found here

 This is a tee-pee card, which I am doing a tutorial for in August on the SSS blog. 


The papers are from my minds eye Christmas collection last year I think and the stars were cut on the silhouette machine.  


We have some blog candy on offer too - who doesn't like getting something FREE  then !

If you hop to all the stops on the blog, leaving a comment along the way then pop back here to the Scrapbook Stamp Society blog and become a follower, leaving a comment too - you could win yourself $12 worth of FREE digis from the store. 
How cool is that ???
There are hundreds to choose from in all different categories so you will be spoilt for choice,  Good Luck
Thanks for hopping and now please hop on over to the lovely Beth

Tuesday 17 July 2012

Tuesday Tutorial for Scrapbook Stamping Society

I cannot claim this album idea is mine have seen it on several blogs/web pages etc but don't know who had the original idea. The image is from here will be putting more of the images on.
 
Recipe
One 12 by 12 piece of card
Two sheets of matching papers
Glue of choice
Embellishments to match
Usual tools

 Fold the 12 by 12 in half, horizontally and vertically use a bone folder for good creases
 Then from corner to corner both ways
 You with then need to cut from the outside edge to the middle once.

 Then fold up the card in concertina fashion, this is what you will end up with.
 Take the 12 by 12 paper and fold on the horizontal and vertical.

 Trim about an 8th of an inch from each of the edge while it is folded finishing with the folded edges. (You may want to trim a little more off it is personal taste)

 Then cut the squares in half, and stick to the album.
  You will need to be aware of the pattern layout if you have used a similar paper design to me.
You can see this in the picture above. 
 This is the album with the papers on both sides

These are the journal cards and the corner holders for them, I had these cut out already from a cutting file, but you could easily make them using a triangle and edging punch.

  This is the inside of the album.  It's really easy to  do, so have a go, if you leave a comment here when you have made one, I will come and look which I will really enjoy. I will be posting a male version later in the week here.
Hugs Bee

TIOT Challenge So very British my DT offering

TIOT challenge here
Sorry some of the pictures are not too good we had some sunshine and so reflections on the card.  Tried  to do a KISS (keep it simple sweetie) card, so only used one stamp and two sheets of paper, a small cutout from another piece and and a piece of card.  The card base is folded for an easel card.
 
I used the London Line papers.  The bus was stamped on white card and on the paper and then I paper pieced it three times. 
 The colouring was done with Pro Markers pastel blue, blender pen and the warm grey range.
The easel  bit is just layered paper and card with the cut out. 

Have a good week, I have a tutorial posting later today for an album Hugs Bee